A successful batch often depends as much on the tools as on the recipe — this brewing equipment guide explains what gear a brewer needs, why each item matters, and how to build a setup that matches skill, space, and budget. It walks through starter kits, all-grain systems, kegging vs. bottling, sanitation, and practical upgrade paths with real-world tips that experienced hobbyists recommend.
Who This Guide Is For
This guide targets craft beer enthusiasts who want to brew at home — from curious beginners to brewers stepping into all-grain and kegging. It’s also handy for casual drinkers who want to understand what goes into their favorite IPAs, stouts, and lagers so they can choose better, whether shopping for equipment or selecting beers to pair with meals. The guidance is geared to typical homebrew batches (5–10 gallons) and scales up to small-scale production practices.
Brewing Process Overview: Why Equipment Matters
Homebrewing breaks down into a few clear stages: mashing (if doing all-grain), boiling, cooling, fermenting, conditioning, and packaging. Each stage has specific equipment needs:
- Mashing: converts grain starches to fermentable sugars — needs a mash tun or extract substitutes.
- Boiling: sterilizes wort and extracts hop bitterness — requires a kettle with good heat control.
- Cooling: rapidly brings wort to yeast-friendly temperatures — needs a wort chiller or plate chiller.
- Fermenting: allows yeast to do its job — fermenters and temperature control matter here.
- Packaging: moves beer into bottles or kegs — bottling equipment or a kegging rig is necessary.
Understanding those stages makes choosing equipment logical rather than random. The right gear keeps beer clean, improves extraction efficiency, cuts time, and reduces wasted batches.
Starter Setup: Essential Brewing Equipment for Beginners
Homebrewers starting out should prioritize equipment that’s inexpensive, easy to use, and reliable. Most beginners begin with extract brewing, which avoids the technicalities of mashing but still produces great beer.
Basic List for a 5-Gallon Batch
- Brewing Kettle (5–8 gallons): A stainless steel kettle with a lid. For a 5-gallon batch, a 7–8 gallon kettle provides safe boil-off headspace.
- Fermenter (6.5 gallons): Food-grade plastic carboy or glass carboy; many prefer a conical or bucket fermenter with an airlock.
- Airlock and Stopper: To allow CO₂ out and keep oxygen and contaminants away.
- Hydrometer or Refractometer: For measuring original gravity and tracking fermentation progress.
- Thermometer: An instant-read digital thermometer or floating brew thermometer.
- Siphon and Bottling Setup: Auto-siphon, racking cane, bottling bucket, bottle filler, capper, and caps.
- Sanitizer: No-rinse sanitizers like Star San or Iodophor are essential.
- Cleaning Agent: Oxygen-based cleaner like PBW or similar.
- Bottles (48–60): Reusable long-neck bottles or flip-top bottles.
- Basic Ingredients Kit: Malt extract, hops, yeast, priming sugar for bottling, and a recipe.
Estimated Cost
A complete extract-brewing starter kit typically ranges from about $100–$250 depending on quality and whether it includes ingredients and instructions. Starter kits from reputable suppliers simplify the learning curve and often include a recipe kit.
Beginner Tips
- Start with extract kits to learn timings, sanitation, and fermentation before moving to all-grain.
- Buy a decent capper — cheap ones fatigue quickly and lead to broken caps or smashed bottle necks.
- Sanitation beats everything. Even a cheaper thermometer and solid sanitizer will prevent more problems than expensive kettles.
Intermediate Equipment: Moving to All-Grain and Better Control
When the brewer wants more control over flavor and efficiency, all-grain brewing is the next step. It requires equipment that handles grains, temperatures, and wort volumes more precisely.
Key Additions for All-Grain Brewing
- Mash Tun: An insulated vessel (often a converted cooler or stainless steel tun) with a false bottom or manifold for lautering. Size usually equals batch volume (e.g., 10–15 gallons for 5-gallon batches).
- Grain Mill: A hand crank or electric mill for crushing grain to improve conversion. Crushing at the right gap avoids husk damage and stuck sparges.
- Hot Liquor Tank (HLT): A separate vessel to heat strike and sparge water when using multi-vessel setups.
- Boil Kettle with Valve: A larger kettle with ball valve makes transfer cleaner and safer.
- Wort Chiller: An immersion chiller is common and affordable; counterflow or plate chillers are faster and more efficient for large volumes.
- Pump: A food-grade pump makes transfers faster and enables recirculation (HERMS/RIMS).
Heating Options
- Home Gas Burner (propane): Powerful and inexpensive. Outdoor use recommended for ventilations and safety.
- Electric Brewing Systems: Induction or electric elements are clean and suitable for indoor brewing but require higher upfront cost and sometimes 240V wiring.
Estimated Cost
An intermediate all-grain system typically costs between $400–$2,000 depending on whether a brewer uses home-modified gear (cheaper) or a commercial-grade setup (more expensive).
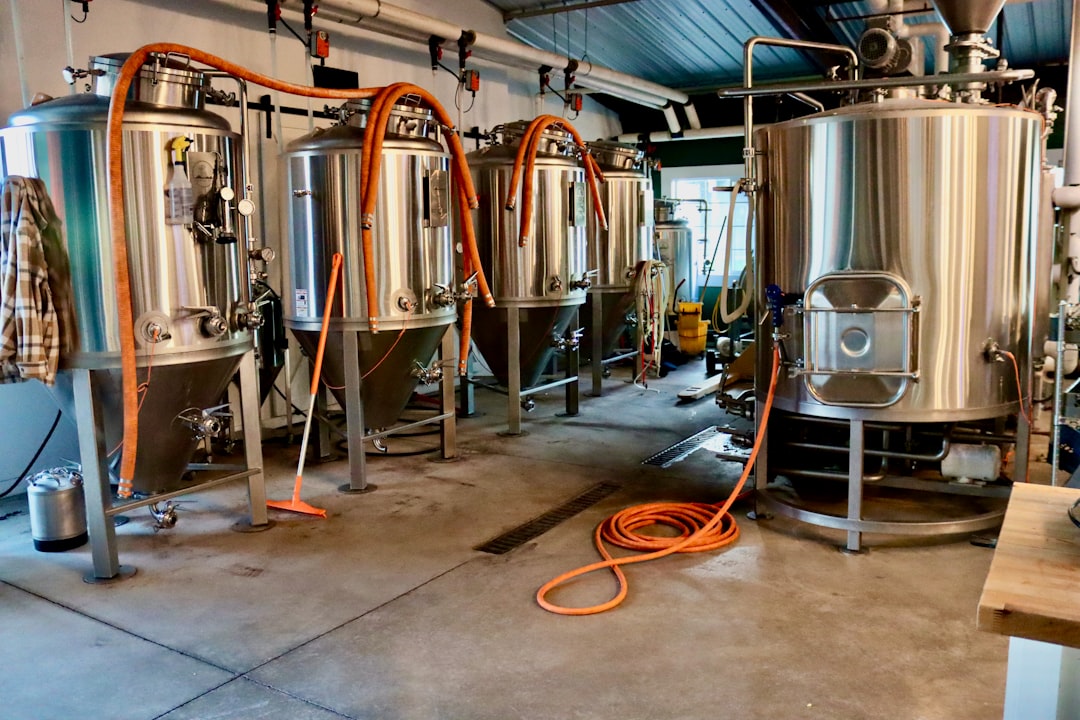
Advanced and Small Commercial Equipment
Advanced hobbyists and nano-brewers who want tight control or to scale production will invest in systems that automate temperature control and increase capacity.
Advanced Items
- HERMS/RIMS Systems: Heat Exchange Recirculation systems that maintain mash temperature precisely and increase efficiency.
- Plate Chillers: Extremely fast chilling, great for improved clarity and reducing infection risk.
- Jacketed and Stainless Steel Kettles: Allow precise heating and easier cleaning.
- Automated Control Panels: PID controllers, temperature probes, and touchscreens to automate mash schedules and boiling profiles.
- Conical Stainless Fermenters with Pressure Capability: These allow yeast harvesting, closed transfers, and better clarification.
Cost and Considerations
Advanced systems can run from several thousand to tens of thousands of dollars. The decision to upgrade should weigh desired output, consistency needs, and the joy of manual brewing. Many brewers find incremental upgrades (chiller, pump, better fermenter) deliver the biggest value per dollar.
Bottling vs. Kegging: Which Is Better?
Packaging is the final step and influences storage, service, and convenience.
Bottling
- Pros: Inexpensive initial cost, easy to transport, nostalgic. Bottles are forgiving for small runs.
- Cons: Time-consuming to fill and cap; more oxygen pickup risk; glass breakage and labeling effort.
- Equipment: Bottling bucket, filler, capper, caps, bottles.
Kegging
- Pros: Faster to package, less oxygen pickup, better carbonation control with CO₂, cleaner pour at parties, reusable kegs.
- Cons: Higher upfront cost (kegs, CO₂, regulator), requires refrigeration or keezer, some additional learning curve.
- Equipment: Cornelius or Sankey kegs, CO₂ tank, regulator, gas lines, couplers, keg fridge or converted chest freezer (keezer).
Practical Recommendation
For anyone who brews more than a couple batches per year, kegging quickly pays for itself in time and beer quality. Beginner brewers often start with bottles, then move to a simple kegging setup with a single Corny keg and 5–10 lb CO₂ tank as the next upgrade.
Sanitation and Quality Control: The Non-Negotiables
Sanitation is the single most important factor in successful brewing. Clean and sanitized gear prevents infections and off-flavors. Quality control practices keep batches consistent and help diagnose problems quickly.
Cleaning vs. Sanitizing
- Cleaning: Removes visible soils and biofilms. Use oxygen-based cleaners like PBW.
- Sanitizing: Kills microbes that cause infection. Use no-rinse sanitizers like Star San or Iodophor.
Key Quality Tools
- Hydrometer or Refractometer: Track gravity to compute alcohol by volume (ABV) and know when fermentation finishes. Note: if using a refractometer after fermentation, apply correction formulas because alcohol changes refractive index.
- Thermometer / Temperature Control: Yeast performance depends on temperature. A rigid scheme reduces off-flavors.
- pH Strips / Meter: Optional but useful for advanced mash tuning and water chemistry.
Common Sanitization Tips
- Sanitize everything that touches cooled wort or beer — even caps and tubing.
- Rinse thoroughly after cleaners, then use a no-rinse sanitizer for final sanitation.
- Avoid overcleaning with harsh chlorine products near stainless steel as it can cause pitting; use neutral cleaners designed for brewing.
Water, Grains, Hops, and Yeast: Ingredients and How Equipment Affects Them
Equipment choices can influence how ingredients behave. For example, hard water minerals affect mash chemistry and hop bitterness perception; better heat control yields cleaner fermentations; faster chillers lock in hop aroma.
Water
Most municipal water works fine for beginners, but understanding mineral content and adjusting for specific styles becomes helpful. Brewing salts (gypsum, calcium chloride) are added to tweak hardness and perceived hop bitterness.
Grain Handling
Crushing grain properly is crucial. A mill allows the brewer to crush only what’s necessary, keeping grains fresh. Grain handling equipment like a grain bag or mash tun determines extraction efficiency.
Hops
Hop handling benefits from a quick boil and rapid chill to preserve volatile hop oils. Dry hopping requires containment that minimizes oxygen exposure — closed containers or kegs with hop bags work well.
Yeast Management
Yeast health matters more than most realize. Yeast starters, proper oxygenation, and pitching quantities adapted to gravity are steps many intermediate brewers adopt. A stir plate and flask make repeatable starters easy.
Maintenance, Safety, and Storage
Regular maintenance extends equipment life and keeps beer quality high. Safety matters: kettles with valves should be tested, propane gear inspected, and CO₂ tanks handled safely.
Maintenance Checklist
- Inspect seals, gaskets, and valves — replace before leaks start.
- Descale kettles and chillers if hard water is present.
- Sanitize, dry, and store hoses to prevent mold.
Safety Tips
- Propane setups require outdoor use or well-ventilated areas and a fire extinguisher nearby.
- CO₂ is odorless — ensure good ventilation and an appropriately mounted tank and regulator.
- Use gloves and eye protection when handling boiling wort or strong cleaning chemicals.
Building a Budget and Upgrade Path
Many brewers benefit from a staged approach: get brewing quickly, then upgrade where the most value is gained. Here’s a practical path.
- Stage 1 — Learn the Basics (Budget $100–$300): Extract starter kit, sanitizer, hydrometer, basic kettle. Brew 3–5 batches to learn fundamentals.
- Stage 2 — All-Grain Transition ($400–$1,200): Buy a mash tun, larger kettle, wort chiller, and mill. Add a pump later for recirculation.
- Stage 3 — Comfort & Speed ($800–$2,500): Add a better chiller (plate), conical fermenter, improved burners, and start kegging with one or two kegs and a CO₂ system.
- Stage 4 — Automation and Scale ($3,000+): Invest in electric systems, HERMS/RIMS, automated controllers, and multiple fermenters for continuous brewing.
Deciding which upgrades to buy first often comes down to where the brewer struggles: temperature swings suggest a fermentation fridge; long chill times point to a better chiller; time spent bottling indicates a kegging system will save hours.
Practical Recipes and Equipment Lists (5-Gallon Examples)
Two short recipes with equipment callouts help illustrate how setups align with styles.
Easy American IPA — Extract (Beginner)
- Equipment: 8-gallon kettle, fermenter with airlock, hydrometer, sanitizer, bottles or single keg.
- Ingredients: 6.6 lb light liquid malt extract, 1 lb light dry malt extract (optional), 1–2 oz Citra hops (bittering/late/dry hop total), ale yeast (e.g., US-05), priming sugar.
- Timeline: Boil 60 minutes, hop additions at 60/15/5, cool, pitch yeast at ~68°F, ferment 7–14 days, bottle or keg, condition 1–2 weeks.
Robust Porter — All-Grain (Intermediate)
- Equipment: Mash tun, 10-gallon kettle, immersion chiller, fermenter with temp control, grain mill (optional), hydrometer.
- Ingredients: 10–12 lb base (pale/Maris Otter), 1 lb crystal, 0.5–1 lb roasted barley, hops (East Kent Goldings or similar), ale yeast (warm-fermenting), water adjusted to style.
- Timeline: Mash 60 minutes at ~152°F, sparge, 60-minute boil, chill, pitch yeast at ~66°F, ferment 1–2 weeks, condition 2–4 weeks.
Troubleshooting: Common Problems and Equipment Fixes
Many brewing issues trace back to equipment or its use. Here are common problems and likely culprits.
- Infections (sour or cheesy off-flavors): Check sanitation practices, worn seals, and open transfers. Replace suspect tubing and tighten sanitation protocols.
- Under-attenuated beer (too sweet): Consider yeast health and pitching rates; oxygenation tools (oxygen stone or vigorous aeration) and yeast starters help.
- Low efficiency: Often caused by crush size, stuck sparge, or poor mash temperature control — a mill adjustment or better insulation helps.
- Hazy beer: Could be chill haze from fast cooling, or protein/polyphenol interactions — use fining agents or cold crash with a conical fermenter for clearer beer.
Where to Buy Equipment and Inspiration
Specialty homebrew shops and online retailers stock reliable gear; local clubs and forums are great for used setups. While Beer Republic focuses on offering a wide selection of American and Canadian craft beers rather than homebrew kits, it’s a useful resource for style inspiration and understanding trends. Brewers can sample beers from Beer Republic’s collections to reverse-engineer flavor profiles or decide which styles to attempt next.
For equipment, reputable suppliers include local homebrew shops and online retailers such as Northern Brewer, MoreBeer, and established brewing-equipment manufacturers. Buying quality for parts that touch hot wort and pressure (kettles, pumps, fermenters) often pays off in the long run.
Legal and Environmental Considerations
Homebrewing is legal across the U.S. and Canada, but limits and rules vary. The brewer should check local laws for batch size allowances and whether distilling or selling homebrew requires permits. Environmental responsibility includes proper disposal of spent grains (great for compost or livestock feed) and avoiding dumping strongly alkaline or chlorinated cleaners down residential drains without dilution. Propane safety and CO₂ handling should follow manufacturer protocols and local codes.
"Good beer starts with clean water and careful hands — the right equipment simply helps the brewer repeat what worked last time."
Choosing the Right Equipment for Different Spaces
Space constraints and neighbors affect equipment choices. An apartment brewer might favor electric single-vessel systems and bottle carbonation, while someone with a backyard can use a large propane burner and outdoor brewing stand. For limited indoor ventilation, electric systems and small-batch kits are safer.
Practical Buying Tips and Brand Selection
- Read reviews and look for warranties on pumps and electronic controllers.
- Stainless steel is worth investing in for kettles and fermenters because it won’t pit or harbor bacteria the way some other metals can.
- Buy modular equipment that can be upgraded — e.g., a kettle with a welded ball valve can be adapted to a more sophisticated system later.
- Consider used gear for heavy items like kettles and large fermenters, but inspect welds, seals, and the interior for corrosion.
Summary: A Practical Path Forward
Brewing equipment choices depend on goals. Beginners gain experience and avoid costly mistakes by starting with extract kits and learning sanitation. Intermediate brewers who want control and better flavor move to all-grain setups, invest in chillers and better fermenters, and often adopt kegging. Advanced hobbyists or small commercial brewers add automation, heat-exchange systems, and stainless processing gear for capacity and consistency.
Across all levels, a few principles hold: prioritize sanitation, focus upgrades on the biggest bottlenecks (temperature control, chilling, packaging time), and use high-quality stainless components where pressure and heat are involved. For recipe inspiration and to sample benchmarks as the brewer refines technique, Beer Republic’s curated selection of American and Canadian craft beers offers a practical library of styles and flavors to study.
Frequently Asked Questions
What’s the minimum equipment needed to brew at home?
For a simple extract batch: a 7–8 gallon kettle, a 6.5 gallon fermenter with airlock, sanitizer, hydrometer, thermometer, siphon, bottles or a single keg, and basic ingredients. A starter kit often bundles most of this and is a low-cost way to begin.
How much does it cost to get into all-grain brewing?
Transitioning to all-grain typically costs an extra few hundred dollars if the brewer converts a cooler to a mash tun and adds a wort chiller. Expect $400–$1,200 for a reliable, efficient setup depending on whether the brewer DIYs components or buys a prebuilt system.
Is kegging worth the money?
Yes, if the brewer plans to brew more than a few batches a year. Kegging saves time, reduces oxidation risk, improves carbonation consistency, and makes serving easier — the cost is recovered in saved time and less bottle waste.
What sanitizer should a homebrewer use?
No-rinse sanitizers such as Star San or Iodophor are recommended because they’re effective and convenient. Use an oxygen-based cleaner (e.g., PBW) first to remove soils, rinse, then apply the sanitizer for final preparation.
Where can a brewer find style inspiration?
Tasting widely helps. Stores like Beer Republic, which carry a wide variety of top-rated American and Canadian craft beers, offer an easy way to sample different styles and identify flavor components to emulate in recipes.
Conclusion
This brewing equipment guide equips the homebrewer with a sensible roadmap: start simply, master sanitation and fermentation, then invest in upgrades that solve real problems — faster chilling, stable temperatures, and cleaner transfers. Combining good equipment with ingredient knowledge and consistent technique produces better beer and makes brewing more rewarding. For inspiration and benchmarks, exploring craft beer catalogs, like the selections at Beer Republic, helps brewers dial in styles they love and chase their next great batch.